More...

More... |
| © 1998 Michael J. Hammel |
 |
Looking through my backlog of things to do for the Muse, I decided to take a look at VRWave. At a minimum I wanted to see if I could simply get it to run. Hopefully, I would be able to say something intelligent about the source code and build environment as well. I jumped on the Internet and went off to grab a copy of the package from a US mirror of the VRWave Home Page (http://www.iicm.edu/vrwave). The first thing I noticed was that there were both source and binary distributions available. The binary distributions cover a few flavors of Unix, including ports for Linux 2.0. There are actually two versions of the binary distribution - a Java 1.1.3 based version and a Mesa version which uses Java 1.0.2. These are actually the platform specific libraries needed by VRWave. I grabbed both along with the gzipped Common tar file which must accompany any binary version that is downloaded. The Mesa version is not compiled with any of the hardware accelerated drivers available for Mesa. If you want to use those drivers you need to recompile the source with the Mesa package properly built with the drivers of interest. Also, the Mesa code is statically linked into the platform specific libraries, so you shouldn't need any other libraries or files outside of those contained in the Common tar file and the platform specific tar file.
The directions say to unpack the Common file first, then cd into the vrwave-0.9 directory this process creates and unpack the platform specific files. The first time I did this I didn't do it in the right order and got myself confused. So I redid the unpacking, following the directions. Its true - men never read the directions. The instructructions in the INSTALLATION file for running VRWave are quite complete so I won't rehash them here. Just be sure you actually read the file! In my environment I use Java 1.0.2, the default installation of Java on Red Hat 4.2, so I set my CPU environment variable to LINUX_ELF. You may need to set it to LINUX_J113 if you have the Java 1.1.3 package installed on your system.
Once you set up a couple of environment variables you're ready to start vrwave. Since VRWave uses your Java runtime environment, be sure your CLASSPATH is set correctly first. On my Red Hat 4.2 system I have it set as follows:
java.lang.InternalError: unsupported screen depth
VRwave: could not load icons at /home/mjhammel/src/graphics/vrwave2/vrwave-0.9/icons.gif
VRwave: could not load logo at /home/mjhammel/src/graphics/vrwave2/vrwave-0.9/logo.gif
java.lang.InternalError: unsupported screen depth
at sun.awt.image.ImageRepresentation.setPixels(ImageRepresentation.java:170)
at sun.awt.image.InputStreamImageSource.setPixels(InputStreamImageSource.java:459)
at sun.awt.image.GifImageDecoder.sendPixels(GifImageDecoder.java:243)
at sun.awt.image.GifImageDecoder.readImage(GifImageDecoder.java:295)
at sun.awt.image.GifImageDecoder.produceImage(GifImageDecoder.java:155)
at sun.awt.image.InputStreamImageSource.doFetch(InputStreamImageSource.java:215)
at sun.awt.image.ImageFetcher.run(ImageFetcher.java:98)
These may be due to either an incorrect Java configuration on my system or because the Java 1.0.2 libraries do not support the TrueColor (24 bit depth) visual I'm running with my X server. In either case it didn't seem to matter, as the window opened and I was able to begin playing with VRWave. Also, during all my experimentation I had no display or color problems at all.
The first thing I should say at this point is that I know very little about VRML other than its a language for describing navigable 3D worlds. VRML 2.0 includes features such as spatial sound, where the sound of an object in the distance can grow louder as the object is moved closer. To my knowledge VRWave does not yet support sounds, but I didn't test any VRML worlds in which sound was availalble. In any case, what I'll describe here is what an casual user might encounter, what someone who is just beginning to explore VRML might find interesting and useful. Also please note that the slight blur in the images is due to reducing them from the screen captures in order to fit the image in a 640 pixel wide Web browser.

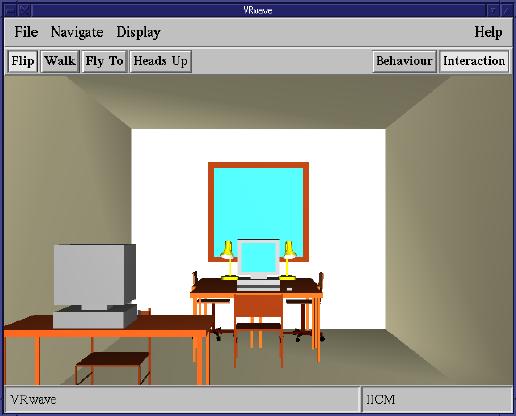
The image above show the initial window if no input file is provided on the command line. You can specify any VRML file as an input file. These carry the .wrl extension in the file name and you can find numerous example in the examples directory in the distribution. Scene files are ordinary text files, not unlike the POV-Ray programming language in a sense. The look like the sample code below, which is the code for the convexify.wrl example:
# sample for applying perface materials onto non-convex shape
# kwagen/mpichler
Viewpoint
{
position 5 5.25 10
orientation -0.6 0.8 0.1 0.5
}
Shape
{
geometry IndexedFaceSet
{
coord Coordinate
{
point [ 0 0 1, 1 0 1, 3 4 1, 2 4 1,
1 2 1, 1 4 1, 0 4 1,
0 0 0, 1 0 0, 3 4 0, 2 4 0, 1 2 0, 1 4 0, 0 4 0 ]
}
coordIndex
[
0 1 2 3 4 5 6 -1 # front,
lt. green
0 7 8 1 -1
# red
1 8 9 2 -1
# blue
2 9 10 3 -1
# yellow
3 10 11 4 -1
# cyan
4 11 12 5 -1
# magenta
5 12 13 6 -1
# dk. cyan
6 13 7 0 -1
# dk. magenta
13 12 11 10 9 8 7 # back, dk.
green
]
color Color { color [ 0 1 0, 1 0 0, 0 0 1, 1 1 0,
0 1 1, 1 0 1, 0 0.5 0.5, 0.5 0 0.5, 0 0.5 0 ] }
# colorIndex [ 8 7 6 5 4 3 2 1 0 ] # reverse color
binding
colorPerVertex FALSE
convex FALSE
}
}
The following table summarizes most of the features in the VRWave main
window:
| Window Feature | Description |
| File | Basic file input/output functions, plus camera information. |
| Navigate | Set mode for movement through VRML world; reset and align functions for current view. |
| Display | Lighting, rendering (static and interative) methods, colors, background, transparency, etc. |
| Help | HTML based help system that relies on Netscape. Netscape must be in your path for this to function properly. |
| Flip | Navigation mode; Scene translation around origin and zoom. |
| Walk | Navigation mode; move forward, backwards, sideways pan and move "eyes". |
| Fly To | Navigation mode; sets a Point of Interest from which all other movements in this mode are relative. |
| Heads Up | Places a "heads up display" in the center of the viewing area; 3 navigation types in display: eyes, body and pan. These correspond to the same types of movements that Walk provides but gives visual cues to movement settings. |
| Behaviour | Purpose unknown |
| Interaction | Purpose unknown |
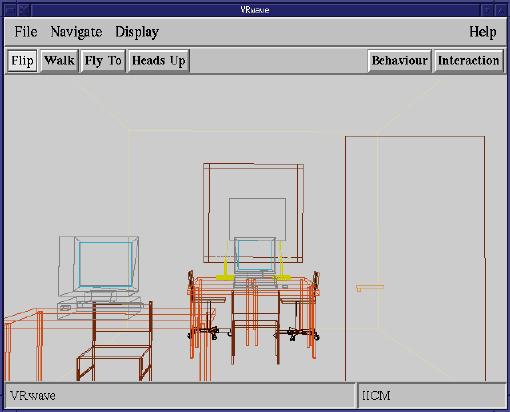
An example of movement through this scene would be to hold down the
middle mouse button (with the Flip button pressed as it is in the example
image below) and drag it around the viewing area. This would rotate
the entire room and its contents around the origin, which is positioned,
but not visible, in the middle of the viewing area. When this movement
is started the image will change to a wireframe view to speed processing.
The use of wireframe, flat shaded, smooth shaded and textured objects during
navigation and static display (when you aren't moving the scene around)
can be controlled from the Display option in the menu bar.


This scene is probably the nicest image, asthetically speaking, of all the examples. The image fills the viewable area and is a complete room. If you navigate around the room you quickly learn that the walls to the room disappear if you're viewing area would be blocked by those walls For example, tilt the room down, then rotate it to the left. You're view of the room is now outside of the right wall, but in order to view the inside of the room the right wall is not drawn. You can change this behaviour by using the Display->Two-sided Polygons option and setting this option "On". The default setting, Auto, will not display the wall if it gets in your way. Turning this option on causes the back sides of the walls to become visible, and so your view inside the room is blocked.

In this next example the Heads Up option is selected and you can see the three view functions displayed in the middle of the viewing area. These small boxes don't move with the rest of the scene as you drag it around the viewing window. They stay centered in that window. A red line is drawn from the center of one of these boxes to the current cursor location showing direction and speed (longer lines give faster speed).
The movement of the small sphere in this image is managed through the
use of the left mouse button, but only when the cursor is over the large
green box. Moving the cursor, left mouse button held down, moves
the sphere around the viewing area. If the mouse leaves the area
of the box then the sphere stops moving. Note that the area of the
box does not mean just a side of the box - it means what ever region of
the box is actually visible to the user.
If you have a fast enough computer and enough memory you can turn on
interactive texturing. This allows you to view the the objects in
the scene with their full textures displayed while you move the scenes
and objects around the viewing area. Although I can't show this
feature here, I can show you another example scene which has a texture
map applied to the sides of a cube. The first example shows the texturing
on a cube with Two-sided Polygons turned off. The next example, which
is a full sized capture so you can see the details a little better, shows
the same image with Two-sided Polygons turned on.


The README file that comes with the binary distribution states that an online users guide for VRWeb (VRWave's predecessor) is available from http://www.iicm.edu/vrweb/help. However, this link doesn't seem to work any more. I browsed the main VRWave web site and found a link to http://www.iicm.edu/vrwave/release, which contains various online documentation. Unfortunately, I didn't find a users guide per se. The best printed help available will be the help/install.html and help/mouse.html files in the runtime directories from the binary distribution. In particular, the mouse.html file contains detailed information about mouse and keyboard bindings for scene navigation.
If you are just getting started with VRML and would just like to
look at a few examples, this is a good place to start. You will need
to have a working Java environment - one that can run Java applets if not
compile Java code. Other than that, installation is a breeze and
there are enough example files to keep you at least midly entertained until
you can write your own VRML worlds.
 |
| © 1998 by Michael J. Hammel |